

Understanding Epoxy Garage Floor Marble Systems vs. Standard Paint
Achieving an epoxy garage floor marble finish in 7 days involves a disciplined multi-step process: Days 1 to 2 focus on diamond grinding the concrete to an open profile, repairing divots, and applying a moisture vapor barrier primer. On Days 3 to 4, technicians pour a 100% solids epoxy base coat, drizzle contrasting metallic accent ribbons, and manipulate the pigments using alcohol dispersion to create realistic stone veining. Finally, Days 5 to 7 involve applying a protective aliphatic polyaspartic topcoat, followed by allowing a full 5- to 7-day cure before returning vehicles to the garage.
Many property owners initially evaluate standard retail floor paints when planning a garage refresh. However, these traditional alkyd or water-based acrylic formulas cure through simple physical evaporation, leaving a very thin film resting on top of the concrete slab. Under the stress of daily vehicle use, thermal expansion, and hot tires, these surface-level films are prone to blistering, flaking, and hot-tire pickup. In contrast, professional resin systems rely on a two-part bisphenol A epoxy resin and a specialized amine curing agent. When blended in exact stoichiometric ratios, these components initiate an exothermic chemical reaction that cross-links into a dense, non-porous polymer matrix anchored deep within the concrete pores.
To help evaluate how different protective systems compare under everyday garage demands, consider the primary structural differences:
| Feature / Metric | 1-Part Retail Garage Paint | Full-Broadcast Decorative Flake System | Metallic Marble Epoxy System |
|---|---|---|---|
| Primary Chemistry | 1-Part Acrylic / Latex | 2-Part Epoxy Base + Polyaspartic Topcoat | 100% Solids Metallic Epoxy + Polyaspartic |
| Typical Film Thickness | 2–4 mils | 30–35 mils | 30–45 mils |
| Bond Mechanism | Surface adhesion only | Deep mechanical cross-linking | Deep mechanical cross-linking |
| Hot Tire Pickup Resistance | Limited (frequent peeling) | Highly resilient | Highly resilient |
| Aesthetic Depth | Flat, solid color | Textured, multi-color granite chip look | Flowing, translucent faux-stone veining |
| Expected Lifespan | 1–3 years depending on wear | Often 15+ years under typical residential conditions | Often 10–20 years depending on use and maintenance |
Understanding the distinct types of poured epoxy flooring helps clarify why high-build resin systems provide significantly greater mechanical strength and longevity than standard surface coatings.
Essential Kit Components for Epoxy Garage Floor Marble Projects
A professional marble coating installation is an engineered assembly of specialized chemical layers designed to bond, flow, and protect:
- Moisture Vapor Barrier Primer: A low-viscosity, high-penetration epoxy that deeply saturates concrete pores, seals micro-fissures, and helps mitigate hydrostatic moisture transmission from beneath the slab.
- 100% Solids High-Clarity Epoxy Resin: The structural body (Part A resin and Part B amine hardener) formulated with zero volatile organic solvents, allowing thick pours without solvent entrapment or film shrinkage.
- Metallic Mica Pigment Powders: Finely milled pearlescent pigments suspended in the resin matrix to generate three-dimensional light reflection and natural depth.
- Clear Protective Topcoat: A hard-wearing aliphatic polyaspartic or urethane layer that shields against surface abrasion, chemical spills, automotive fluids, and ultraviolet discoloration.
- Application Sundries: Spiked aeration rollers, calibrated notched squeegees, mechanical mixing paddles, and spiked shoes designed for wet-edge access.
The Science of Metallic Pigment Movement
The organic swirls and Calacatta-like ribbons of a marble-style finish are governed by fluid mechanics, gravity, and surface tension dynamics. The pigments themselves are microscopic platelets of synthetic mica coated with titanium dioxide or iron oxides. Because these platelets have a higher density than the liquid polymer, they orient at varying multi-dimensional angles as the resin flows across the concrete floor.
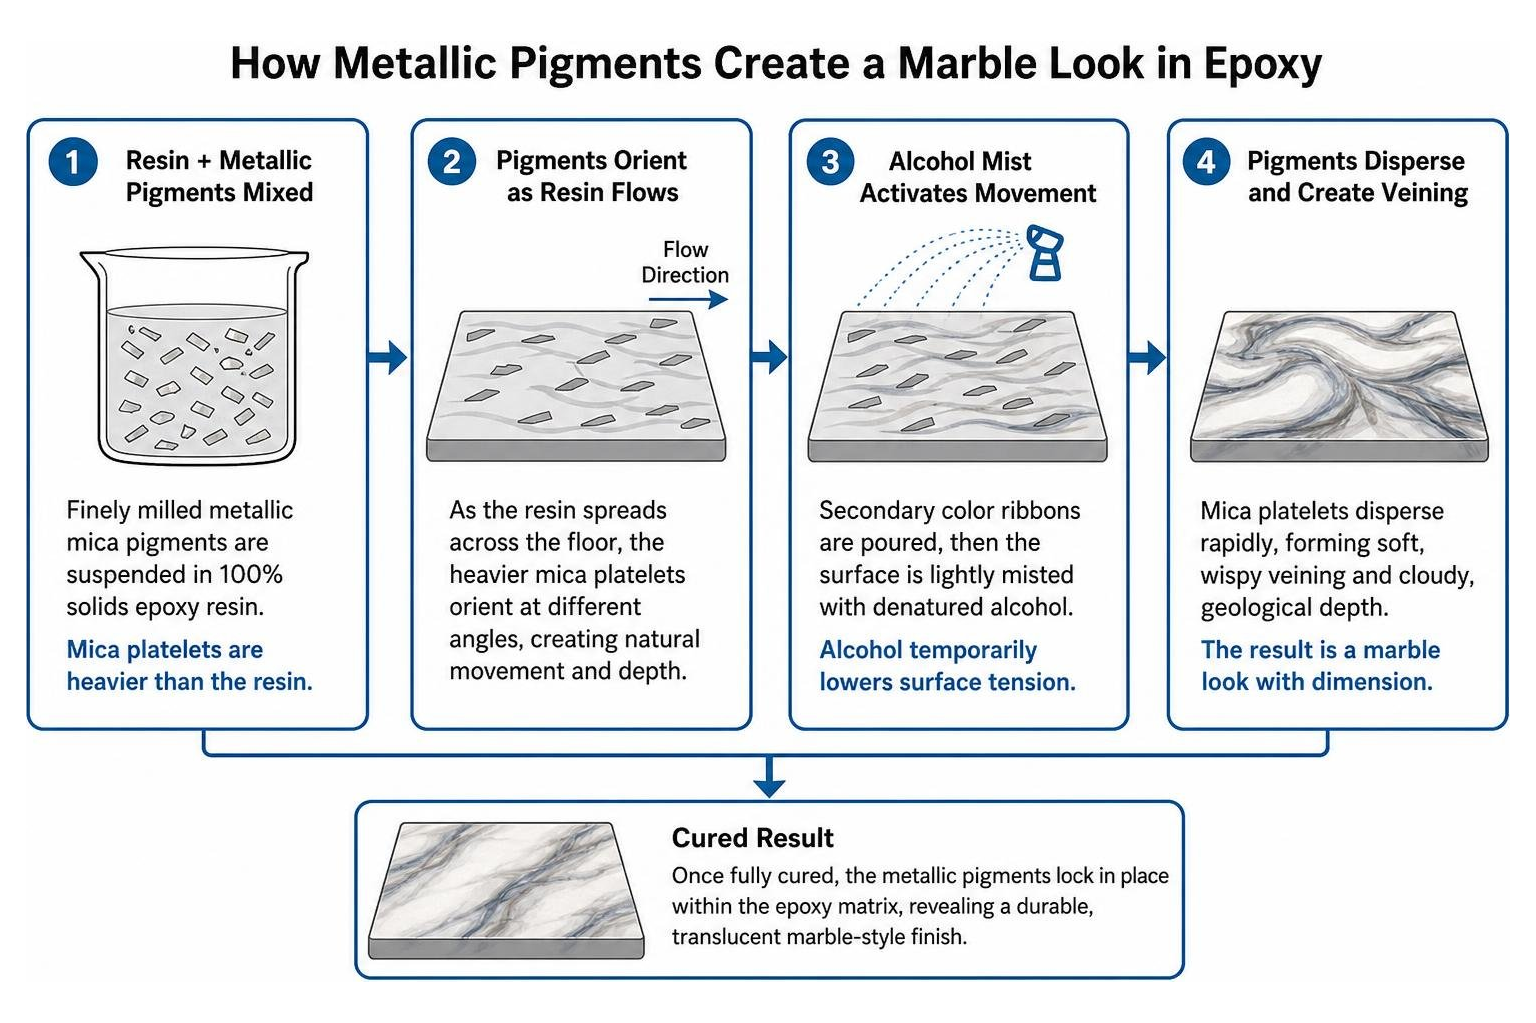
When secondary color ribbons are poured into the wet field coat, a technician can lightly mist the surface with denatured alcohol or specialized dispersing agents. The solvent temporarily lowers local surface tension, gently driving the mica platelets outward into soft, wispy secondary veining that mirrors the geological strata of quarried Italian marble. For a broader exploration of these specialized materials, our overview in The Complete Guide to Metallic Epoxy Coatings covers the underlying resin chemistries in detail.
Critical Surface Preparation and Safety Protocols

No epoxy system—regardless of formulation quality—can form a permanent bond to contaminated, smooth, or poorly prepared concrete. Professional experience demonstrates that the vast majority of long-term coating performance depends entirely on meticulous mechanical surface preparation.
Concrete must be profiled using commercial planetary diamond floor grinders equipped with aggressive diamond-matrix tooling. Grinding removes the weak, smooth surface laitance, clears away old sealers, and opens the concrete pores to achieve an industry-standard Concrete Surface Profile (CSP) of 2 to 3. Acid washing methods are generally avoided on dense, power-troweled garage slabs because acid often reacts inconsistently across the floor, fails to open tight capillary pores uniformly, and introduces unwanted moisture deep into the concrete slab.
Prior to mechanical grinding, technicians evaluate the slab for relative humidity and hydrostatic moisture vapor emission. If concrete moisture levels are elevated, specialized moisture-mitigation primers must be specified to help reduce the risk of future delamination or osmotic blistering. Grease, transmission fluid leaks, and motor oil stains must be degreased and chemically treated prior to diamond grinding to prevent driving contaminants deeper into the pores. While concrete floor repair is only a small component of the company’s floor-coating preparation work, filling static cracks, spalls, and divots with high-strength epoxy patching paste ensures the finished surface stays smooth, level, and structurally integrated.
Working with multi-part polymer resins also requires strict safety discipline:
- Respirators: Installers wear NIOSH-approved respirators equipped with organic vapor cartridges during mixing and polyaspartic topcoat application.
- Skin Protection: Chemical-resistant nitrile gloves, eye protection, and long sleeves are essential, as direct contact with liquid amine hardeners can cause skin sensitization over time.
- Pot Life Awareness: Mixed epoxy undergoes an exothermic reaction that generates heat inside the bucket. Installers maintain a strict working window of roughly 20 to 30 minutes to pour the material onto the floor before it begins to gel.
The 7-Day Marble Garage Floor Application Guide
Achieving an artisan-grade faux-stone finish requires precise sequencing and disciplined environmental controls. Ambient and slab temperatures should ideally remain between 60°F and 85°F, while relative humidity must stay below 65% RH to ensure predictable curing rates and proper pigment flow.
Days 1 to 2: Mechanical Grinding, Repairs, and Primer Application
The project begins with comprehensive diamond grinding and continuous HEPA dust containment across the entire slab. Once vacuumed completely clean, any hairline cracks or minor surface pitting are repaired using rigid epoxy crack fillers.
Next, technicians roll out a dedicated moisture-mitigating epoxy primer. This base layer seals the concrete surface to prevent outgassing bubbles from rising into the thick decorative layers later on. Following a standardized epoxy floor installation process ensures the primer cures properly over a 16-to-24-hour window before the main color layer is introduced.
Days 3 to 4: Step-by-Step Veining Techniques for Epoxy Garage Floor Marble Effects
Once the primer has cured to a clean, tack-free finish, the decorative metallic coat is prepared. The primary field color—often a bright pearl white, soft platinum, or warm alabaster—is mechanically mixed with high-clarity resin for three full minutes to achieve total pigment suspension. The material is poured onto the floor in long ribbons and distributed using a calibrated 1/8-inch notched gauge rake to achieve a continuous, self-leveling build of approximately 30 to 40 mils.
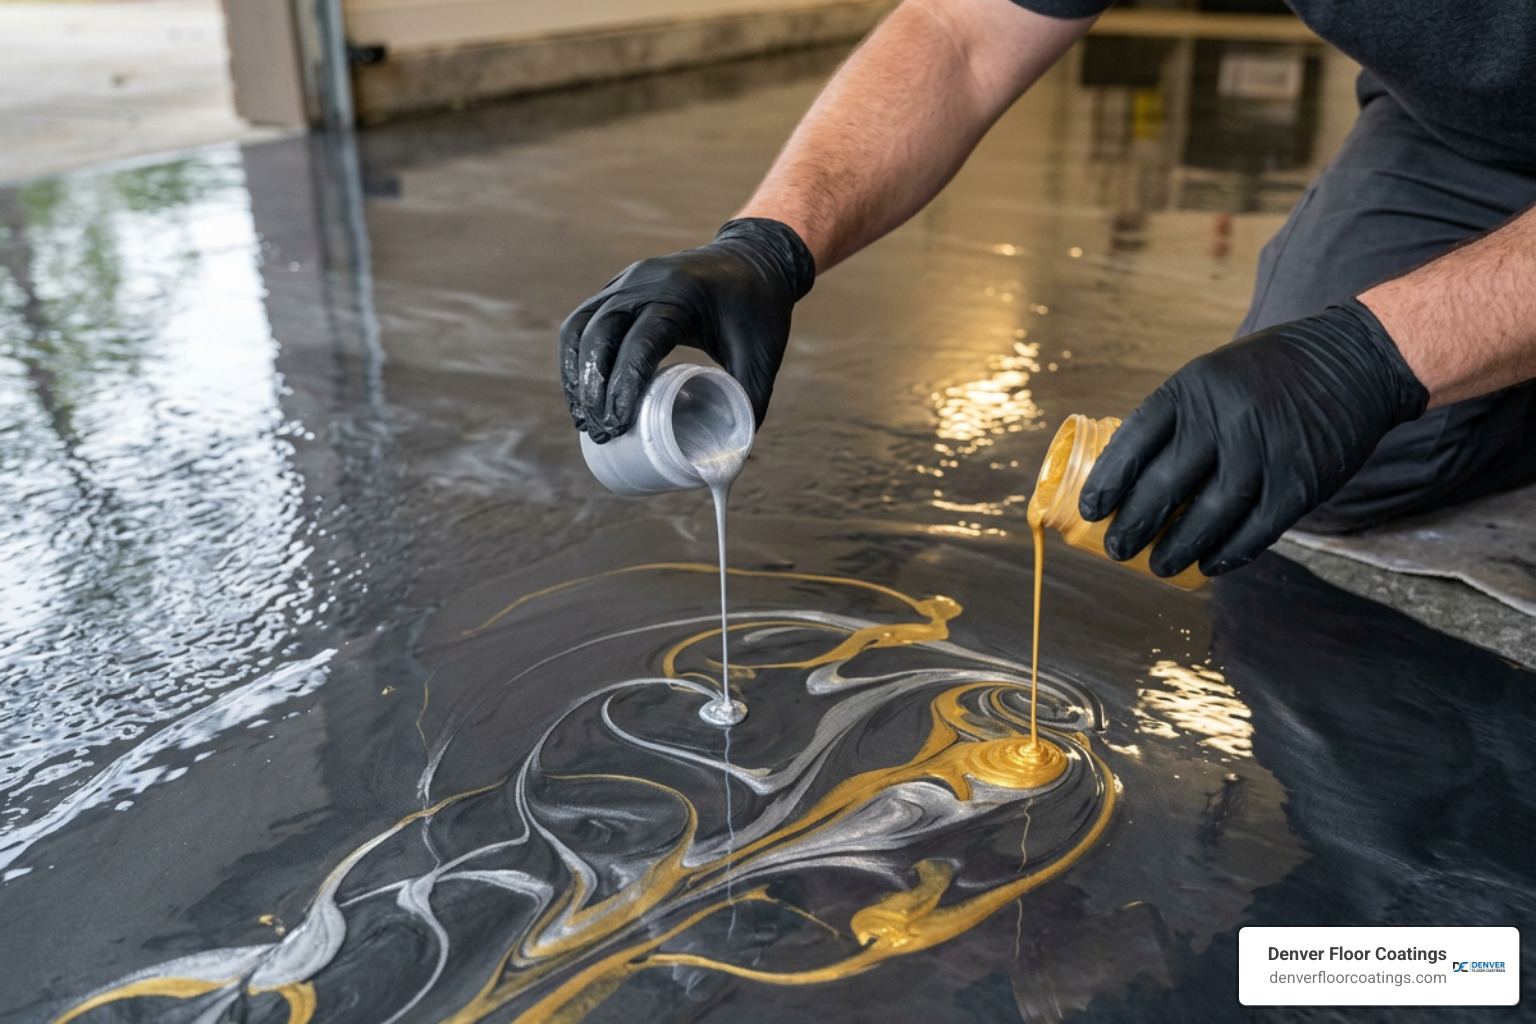
While the primary field remains wet and workable, accent colors (such as deep charcoal, slate gray, or subtle gold) are drizzled across the floor in natural, branching diagonal lines. Technicians use clean chip brushes or notched squeegees to lightly feather the ribbons into organic contours. For step-by-step techniques on working with accent ribbons and alcohol misting, you can review our metallic marble epoxy flooring how-to instructions. Finally, a spiked de-foaming roller is passed across the surface to release any entrapped air bubbles, allowing the pigments to settle into organic veining over the next 24 hours.
Days 5 to 7: Protective Topcoat and the Full Cure Timeline
A metallic marble layer alone provides striking depth, but it requires a high-performance industrial wear shield to handle hot vehicle tires, abrasive dirt, and road salt. On Day 5, a clear aliphatic polyaspartic topcoat is applied across the entire floor. Where requested, micronized polymer or aluminum oxide grit is broadcast into the clear coat to provide reliable traction underfoot.
The final cure schedule should be carefully observed to protect the investment:
- 24 Hours: Light, sock-footed pedestrian traffic is typically permitted.
- 48 Hours: Normal foot traffic and moving lightweight items back into the garage.
- 72 Hours: Full chemical cross-linking is reached, providing strong resistance against automotive fluids and household chemicals.
- 5 to 7 Days: Safe for full vehicle parking, heavy toolboxes, and water exposure.
Professional Installation Standards for Marble Resin Systems
Metallic marble coatings represent one of the most technically demanding applications in the concrete coating industry. Achieving a balanced, high-end stone appearance requires specialized equipment, precise environmental controls, and skilled material handling.
Understanding the epoxy flooring pros and cons is critical when planning a garage transformation. A metallic pour leaves very little margin for error. The open working time of high-solids resins is brief, and overworking the wet material with rollers or squeegees can turn distinct marble veining into a muddy, uniform pool. Professional floor coating crews utilize industrial planetary diamond grinders with integrated HEPA dust-extraction units to ensure the concrete slab reaches the precise surface profile required for long-term mechanical bonding.
Homeowners looking for local installation standards and climate considerations can consult our garage epoxy floor coatings Denver guide to learn how professional systems are tailored to withstand regional temperature swings and heavy garage use.
Long-Term Maintenance and Common Failure Points to Avoid
Once fully cured, a seamless resin floor is remarkably easy to care for. Routine maintenance requires only a soft dust mop to remove loose debris, followed by periodic mopping with clean water and a pH-neutral floor detergent. Harsh chemical strippers, concentrated citrus degreasers, and acidic cleaners should be avoided, as they can haze the clear topcoat over time.
As detailed in our foundational guide epoxy floors explained, the primary causes of premature coating issues include:
- Hydrostatic Pressure: Trapped moisture rising through an unsealed slab can cause non-primed epoxies to blister and delaminate.
- Surface Contamination: Lingering motor oil, grease, or curing compounds prevent the resin from anchoring to the concrete pores.
- Topcoat Wear: In high-traffic environments, clear topcoats may eventually lose some of their original gloss. Periodic re-screening and applying a fresh clear protective topcoat every 5 to 10 years will help maintain both optical clarity and surface protection.
Frequently Asked Questions About Marble Epoxy Garage Floors
Can marble epoxy floors be installed over damaged or previously coated concrete?
Yes, provided the underlying concrete is structurally sound. Any old paints, failing sealers, and loose coatings must first be completely stripped away using mechanical diamond grinding down to bare, porous concrete. Structural repairs and divot patching can then be completed prior to the primer application.
How slippery is a high-gloss marble epoxy floor when wet?
A completely smooth, high-gloss resin surface can become slick when wet with rain, melted snow, or automotive fluids. To maintain a safe walking environment without muddying the optical clarity of the marble pattern, a micronized polymer anti-slip grit or fine aluminum oxide additive can be suspended directly into the clear protective topcoat.
Will direct sunlight cause a marble epoxy floor to turn yellow over time?
Standard epoxy resins are naturally sensitive to ultraviolet light and can take on an amber or yellow hue if exposed to direct sunlight near garage door openings. To maintain crystal clarity and preserve the bright whites and grays of a marble floor, the system should always be sealed with a UV-stable aliphatic polyaspartic clear topcoat.
Conclusion: Achieving Lasting Luxury for Your Garage Floor
A marble-look garage floor combines the visual drama of natural polished stone with the functional benefits of an engineered resin system. While achieving realistic veining requires careful timing, proper environmental controls, and specialized equipment, a completed multi-layer system can provide a clean, modern finish that elevates any residential garage.
Denver Floor Coatings specializes in high-performance epoxy and polyaspartic coating systems, including decorative flake finishes, rather than stained concrete services. If you are ready to upgrade your garage with a durable, professionally engineered coating designed for Colorado conditions, explore durable garage floor coating solutions or contact our team for a professional consultation today to get started on your project estimate.